
In version 2.1 of the robotic xylophone MIDI files are copied directly onto an SD card, and the Arduino reads these MIDI files directly and generates note events in real time. I have standardized on using an SD card, rather than SPI Flash because: 1.) the SD card and data logger shield are easier to find online, and 2.) the software is much simpler.
The Master Program is the main program, which reads a list of MIDI files from the SD card, displays the list of MIDI files on the LCD, and generates MIDI events when the user clicks the button to play a song. The Master Program sends serial commands to one or more “Slave Arduino’s” which actually fire the solenoids.
Both the Master Program (XylophoneSD.ino) and the Slave Program (L293DBoardSerial.ino) are available for free download on Github.
Software is loaded onto the Arduino’s during the Electronics portion of the assembly. The program L293DBoardSerial.ino is loaded onto each of the Slave Arduino’s as per the instructions.
The Master Arduino uses the program XylophoneSD.ino. This program requires a few external libraries that are not part of the standard Arduino IDE build:
- OneButton – Performs button debounce function and detects button click and long press
- LiquidCrystal_I2C – Needed for the I2C Character LCD
- SdFat – Implements File System functions for SD Card. This is needed by the MD_MIDIFile library.
- MD_MIDIFile – Standard Midi File processing library. This is what enables the program to read and play MIDI files directly from the SD card.
Refer to the Arduino website for instructions on installing external libraries.
Update: A few readers have pointed out to me that the XylophoneSD.ino program does not compile with the SdFat library version that is currently on Github. If you run into this, please Contact me, and I will send you the version of this library that I used. At some point, I will update my software to work with the current library version.
The first three libraries can be used as is. But for the MD_MIDIFile library, I made a few small changes to make it work better with my program:
1. In the MD_MIDIFile.h file, change MIDI_MAX_TRACKS from 16 to 8. This is the maximum number of tracks in the MIDI file that will be processed. Because the Master Program uses almost all available RAM on the Arduino Uno, I found it necessary to reduce the number of tracks in order for the program to function properly.

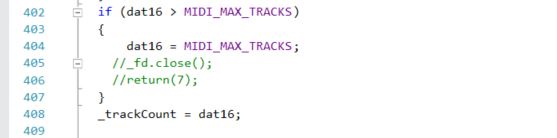
2. In the “load” function of the MD_MIDIFile.cpp file change the check for number of tracks as shown below. The original MD_MIDIFile library will throw an error if the actual number of tracks in the MIDI file is more than MIDI_MAX_TRACKS. I want to change the behavior so that this scenario will continue to load the MIDI file but just discard any tracks more than the maximum. I have found that a lot of MIDI files have many “empty” tracks at the end which don’t have any actual notes, but just some text, such as author or copyright info. Making this change to the “load” function will allow these MIDI files to play on the xylophone.
Once you have all the Arduino libraries, download the XylophoneSD.ino program from Github. Prior to loading the program onto the Master Arduino, you will likely have to make some changes to the #define constants:
Set BYM_LCD_I2C_ADDRESS to the address of the LCD. For most I2C character LCD’s this is either 0x27 or 0x3F.

Set the lowest note and number of notes for the xylophone. Notes are specified as the MIDI note number. For example, a G-to-G 2-octave chromatic xylophone would have BYM_NOTE_LOWEST = 55 and BYM_NOTE_COUNT = 25.

Using the BYM_NOTE_xx defines, set the mapping between the slave address / channel number and the actual xylophone notes (e.g. G3, G#3, A3, etc.). BYM_NOTE_00 is the lowest xylophone note, BYM_NOTE_01 is the second lowest note, and so forth. Each BYM_NOTE_xx is a byte in hexadecimal format where the top nibble is the slave address and the bottom nibble is the channel number (0 through 7).
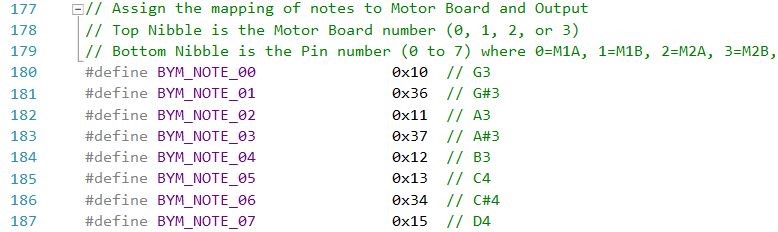
For example, on the G-to-G chromatic xylophone:
- #define BYM_NOTE_00 0x10 //–> G3 solenoid wired to Slave 1, Channel 0
- #define BYM_NOTE_01 0x36 //–> G#3 solenoid wired to Slave 3, Channel 6
- #define BYM_NOTE_02 0x11 //–> A3 solenoid wired to Slave 1, Channel 1
- and so forth
Refer to the Motor Driver Tutorial for a diagram of channel numbers.
After making the necessary changes to the XylophoneSD.ino program, download to the Master Arduino. Use the “Solenoid/Note Test” and “Chromatic Scale” options on the Hardware Test menu to make sure that everything is right. Refer to the Electronics instruction page for pictures and videos.
Next: SD Card Config
